< Previous | Contents | Manuals Home | Boris FX | Next >
Random Dots
Random Dot calibration can produce very dense datasets to drive the most accurate calibrations, including a nearly direct measurement of the camera field of view, based on a setup that does not itself require measurement or calibration! This zero-knowledge approach is pretty remarkable.
The random dot method does require some effort to set up, and it is a "back in the studio" method, rather than an "out in the field" method. Conceptually an appropriate natural scene could be used, but suitable conditions are unlikely to be reliably available.
The setup begins with a enclosed room, say 20-30 ft (6-9m) across, preferably with a ceiling 10ft (3m) high or more. The room and walls don't have to be bare, but the interior of the room needs to be clear. If studio space isn't available, a two-car garage with the cars removed can suffice.
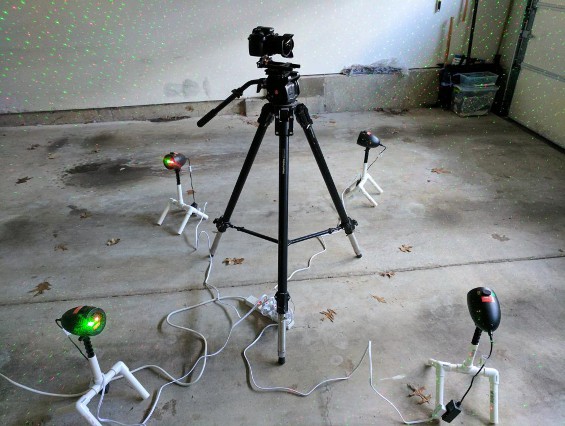
Next, you'll need four holiday laser projectors, as available online or at local retailers (in season) for roughly $20-$40 each. These generate an array of red and/or green laser dots. You must be able to disable any motion: the dots must not move. We've used "StarTastic Holiday Light Show Static Laser Light Projector" mounted onto a small stand created with PVC tubing and connectors. A small piece of electrical tape defeats the daytime/nightime sensor.

The four projectors get set up in the room, pointing at each corner, relatively far back (not under the camera) to maintain even spot brightness 360° around the room. There must not be any major dropout regions. Note that objects on the wall are not an issue; they receive dots just the same.

The camera goes on a pan head tripod in the center. The camera setup should place the camera's optic center at the tripod's center of rotation, using a small rail rig. (Discussion on the proper pivot point.) Adjust the camera focus appropriately to start with.
The live shoot takes place in the dark. The shutter time should be adjusted down to 1/250th or so: it is crucial to minimize motion blur, as the spots are very small! So generally the iris will be open. It is OK to increase the ISO speed to maintain brightness.
Even though motion will be slow, we recommend previously determining the rolling shutter value for the camera, so that it can be used by the calibration.

You must create a pan sequence of 380° or so (360° plus some safety margin), moving slowly and evenly. Ideally a motor drive would be great, but walking around behind the camera is fine too. (Be careful not to step on the power cords, as this may move the spots!) The smaller the field of view of the camera, the slower and more even the pan must be. Be sure to be slow and consistent when approaching the 360° mark. Include brief stationary sections at the beginning and (380°) end of the shot, so that the trackers there don't wind up with unnecessarily short lifetimes.
The random dot calibration process uses a densely-tracked version of the shot as its input data. The many identical dots require a specialized processing workflow.
Here's the process for producing usable trackers from these sequences.
Open the shot (movie files may take a little while to index). Don't hit OK on the shot settings panel yet!
If possible, supply a previously-determined rolling-shutter value. The effect is small, but so are the calibration effects we are measuring. (Note: the shutter time doesn't affect rolling shutter.)
Click on Image Preprocessing, then on its Rez tab, and select the G channel only (at least for the lights we use, where there are many more G spots).
Click OK on the image preprocessor.
For anamorphic shots, open them initially without the anamorphic correction, ie stay with square pixels
Click OK on the shot setup dialog
Go to the Features panel
Select Random Dot mode instead of Normal Motion
Click Advanced
Turn on the Auto Re-blip checkbox.
Adjust the (small) blip size to avoid duplicates on large out-of-focus dots (scrub through the shot past the initial stationary portion to check)
Adjust the minimum tracker length depending on the field of view small FOV means short on-screen time
Adjust the maximum tracker count depending on what you have 4000, 6000,...
Click "Clear all blips" then "Blips all frames"
Click "Peel All"
Do NOT delete blips they are needed for 360° processing!
For anamorphic shots, after doing the blips and trackers, Edit Shot to add the anamorphic factor, bringing the shot to its full real-world image aspect ratio.
Clean up the trackers, looking for spikes and jumps.
Look for, and delete, any stationary trackers (which can arise from bad sensor pixels or dust).
Run the calibration in Random Dot mode (see the rest of the documentation). We recommend supplying a rolling shutter value for this camera, and enabling it to correct the calibration (see the bottom of the Lens Setting panel during calibration).
Verify that it found the correct frame to loop back to, ie the one closest to 360°. That will be the last frame with a key on it in the timebar with the camera selected. Verify that the links between the initial and final trackers are all short.
If the loopback detection didn't work out, undo the calibration and set up a link between a single tracker from the beginning of the shot and a tracker on the same feature when the camera has looped back around. Then re-run the calibration.
Note that only the keyed frames (in the timebar with the camera selected) will show a match between the 2D and (far) 3D versions of the trackers and an exact match will be shown only if there is no rolling shutter correction! This just reflects what the calibration is actually doing.
©2024 Boris FX, Inc. — UNOFFICIAL — Converted from original PDF.
