< Previous | Contents | Manuals Home | Boris FX | Next >
Advanced Lens Workflow
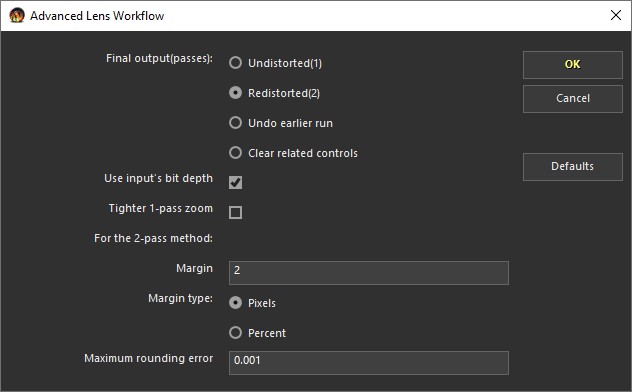
This panel, implemented by a Sizzle script, is launched from the Lens Workflow button on the Lens panel, most typically when it appears as the second control panel under the solver panel in the Solver room. A Lens Workflow button also appears on the Summary panel.
There are two Lens Workflow scripts: this one, and an older Lens Workflow script which handles only the “Classic” lens model. The Lens Workflow buttons examine the current lens type to determine which script to automatically launch. See Lens Workflow reference for a description of its similar but slightly different controls.
Both versions prepare a solve that has resulted in lens distortion values for easier processing in other applications, without relying on any overscan handling. The images will be padded or cropped, and the camera field of view and tracker positions will be modified to maintain the match. The lens distortion values are transferred from the solver to the image preprocessor, so that it removes the distortion, and the solver’s distortion parameters are set to zero.
Important : Don’t run the Lens Workflow, then run the solver again, computing a distortion on top of that distortion . You won’t be able to modify or remove the first set of distortions. You must remove the second solve, Undo the original lens distortion, then re-solve.

Final output (passes): Select the desired lens workflow with the following settings; this is a key decision about what you want and what will ultimately be delivered to downstream users. These radio buttons (and all the rest) control what happens when you eventually select OK on the panel.
Undistorted(1). Radio button. You will ultimately deliver footage with no distortion. The largest window within the undistorted image will be selected for delivery. Pixels falling outside that rectangle (ie typically from the corners of the original distorted images) will not be used in the final image. This is a one-pass workflow, ie one pass to undistort the image.
Redistorted(2). Radio button. You will ultimately deliver footage with distortion. All pixels from the original image will appear in the final image. This is a two-pass workflow: one pass to undistort the footage for reference while composing the scene in 3-D apps, then a second pass after 3-D elements are rendered to redistort them before the distorted version is composited onto the original images.
Undo earlier run. Radio button. Use this item to computationally reverse the effect of previously running the lens distortion script. The lens distortion parameters in the image preprocessor must not have been altered before using this option, or the operation cannot be reversed, and the shot and tracking data will no longer match.
Clear related controls. Radio button. Clears the image preprocessor lens distortion settings that the Lens Workflow script adjusts. This is useful only when starting over.
Use input’s bit depth. Checkbox. When set (normally), the image preprocessor will be set to produce the same depth as the input. When off, the settings won’t be changed---typically that will result in the default 8-bit settings (good while tracking) continuing on, which can be bad if you are planning to write out undistorted footage, inadvertently clipping it to 8 bit.
Tighter 1-pass zoom. Checkbox. For the one-pass method, if checked, uses a more advanced method to determine the minimum zoom required to obtain a fully-filled output image. Less zoom means higher resultant image quality Whether or not this matters depends on the vagaries of the distortion of a particular shot.
The following controls apply only for the two-pass method.
Margin. Number. See the Margin type for the interpretation of this value.
Margin type. Selector. When set to Pixels, the Margin specifies how many extra pixels are put around the undistorted size of the image, typically so that filtering images don’t hit the edge. When set to Percent, the Margin specifies an overall expansion of the image by that many percent, hopefully large enough to encompass the undistorted image. If not, an error message will be produced.
This option is useful when handling a variety of shots with somewhat varying distortions, ensuring that they all come out with the same consistent size (at the expense of some extra padding). Both options can create slight mismatches at the edges if the resulting image size doesn’t exactly match the original image aspect ratio.
Maximum rounding error. Fraction of a pixel. The maximum permitted error, in pixels, as it selects padded image sizes that best maintain the original image’s aspect ratio. Any changes to that aspect ratio create small errors that reduce the match's accuracy. For example, a 16:9 image will keep that exact aspect ratio if the horizontal resolution is increased by a multiple of 16, and the vertical resolution is increased by that same multiple of 9. For some irregular image sizes, the size may have to increase by a large amount to maintain the aspect ratio. If the padded size is much too large, slowly increase the allowable Maximum rounding error (0.01? 0.02?, 0.05?, 0.1?), permitting a slight mismatch to reduce size.
Values over 0.5 suppress aspect-maintaining padding as any number can then be rounded to an integer.
©2024 Boris FX, Inc. — UNOFFICIAL — Converted from original PDF.
