< Previous | Contents | Manuals Home | Boris FX | Next >
Quick Start: Supervised Tracking
Sometimes you will need to “hand track” shots, add additional supervised trackers to an automatic track, or add supervised trackers to help the automated system with very jumpy shots. Although supervised tracking takes a bit more knowledge, it can often be done relatively quickly, and produce results on shots the automated method cannot handle.
Tip : Be sure to watch the Borisfx online tutorial “ Supervised Tracking Master Class” which is an extended presentation of many details of supervised tracking.
To demonstrate, manually match-move the demo shot flyover . Start SynthEyes and select File/New or File/Import/Shot . Open the flyover shot.
The shot settings panel will appear; it should not require adjustment.
The first major step is to create trackers, which will follow selected features in the shot. We will track in the forward direction, from the beginning of the shot to the end, so rewind
![]() to the beginning of the shot. On shots where features approach from the distance, it is often more convenient to track backwards instead.
to the beginning of the shot. On shots where features approach from the distance, it is often more convenient to track backwards instead.
Switch to the ![]() Trackers room and click Create (
Trackers room and click Create ( ![]() ). It will bring up the tracking control panel
.
). It will bring up the tracking control panel
.
Tip : You can create a tracker at any time by holding down the ‘C’ key and left- clicking in the camera view.
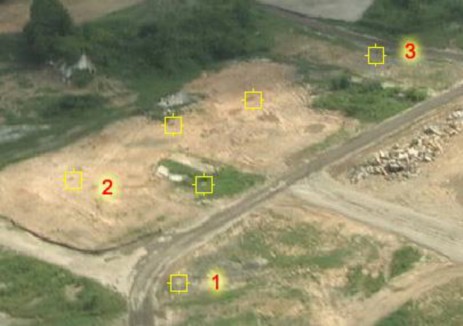
Begin creating trackers at the locations in the image below, by putting the cursor over the location, pushing and holding the left mouse button, and adjusting the tracker position while the mouse button is down, looking at the tracker “insides” window on the control panel to put the “point” of the feature at the center. Look for distinctive white or black spots in the indicated locations.
Important : Normally you should always specifically configure the tracker size, search area size, and tracking prediction mode on the Track menu. See the Supervised Tracking section for details.
You'll also see a tracker mini-view pop up on the camera view. You can control when and where that pops up via preferences.
Tip : the name of each supervised tracker will be shown in the camera, perspective, and 3D viewports, by default. You can have none of the names shown, or the names shown for all trackers, using the controls on the View menu.
After creating the first tracker, click the green swatch
![]() under the tracker mini- view window and change the color to a bright yellow to be more visible. Or, to do this after creating trackers, control-A to select them all, then click the swatch.
under the tracker mini- view window and change the color to a bright yellow to be more visible. Or, to do this after creating trackers, control-A to select them all, then click the swatch.
Tip : there are two layouts for the tracking control panel, a small one for recommended for laptops, and a larger one recommended for high-resolution displays, selected by the Wider tracker-view panel checkbox in the preferences. In between, take your pick!

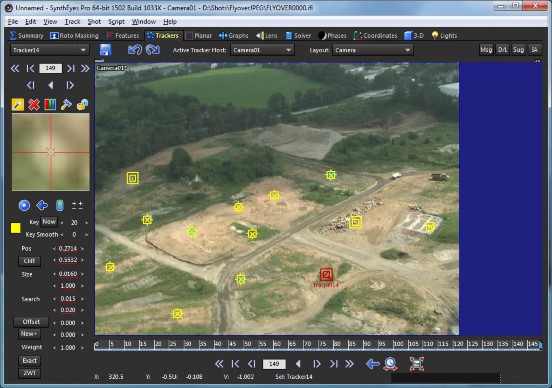
Once the eleven trackers are placed, you can turn off the creation tool by clicking it again. Type control-A (command-A on Mac) to select all the trackers. On the tracker control panel, find
![]() . In this spinner, called “Key Every,” push and drag the value from zero to 20. This says you wish to automatically re-key the tracker every 20 frames to accommodate changes in the pattern.
. In this spinner, called “Key Every,” push and drag the value from zero to 20. This says you wish to automatically re-key the tracker every 20 frames to accommodate changes in the pattern.
Tip: you should have at least six trackers visible on each frame of the shot, with substantial amounts of overlap if they do not last throught the shot. For good results, keep a dozen or so visible at all times, spread out throughout the image, not bunched together. If the shot moves around a lot, you may need many more trackers to maintain satisfactory coverage.
Hit the Play button ![]() , and SynthEyes will track through the entire shot. if you select an individual tracker, you'll be able to see a
tracking figure
of merit at the bottom
, and SynthEyes will track through the entire shot. if you select an individual tracker, you'll be able to see a
tracking figure
of merit at the bottom
right in the error curve mini-view —this is only available here before the tracker is solved (from the graph editor later). The values don't matter, only the shape.
On this example, the trackers should stay on their features throughout the entire shot without further intervention. You can scrub the time bar back and forth to verify that. You will notice that one tracker has gone off-screen and been shut down automatically. (Advanced feature hint: when the image has black edges, you can adjust the Region-of-interest on the image preprocessor panel to save storage and ensure that the trackers turn off when they reach the out-of-bounds portion.) If necessary, you can reposition a tracker on any frame, setting a key and teaching the tracker to follow the image from that location subsequently.
After tracking, with all the trackers still selected (or hit Control/command-A), click the
Lock ( ![]() ) button to lock them
) button to lock them
![]() , so they will not re-track as you play around (…or get messed up).
, so they will not re-track as you play around (…or get messed up).
Tip : you can turn on View/Timebar background/Tracker count to see a color- coded background showing whether or not there are enough usable trackers on each frame.
Now you will align the coordinate system. This is the same as for automatic tracking, except performed before any solving. See
Setting Up the Coordinate System
for more details on why and how to set up a coordinate system. Switch to the
![]() Coordinates room using the toolbar. You might as well switch the Layout to Camera since the trackers aren't solved yet, and there is nothing to see in the 3D views.
Coordinates room using the toolbar. You might as well switch the Layout to Camera since the trackers aren't solved yet, and there is nothing to see in the 3D views.

This is a similar guide picture to that from auto-tracking, though the trackers are in different locations. Click the *3 button, then click on tracker #1. Click the *3 button, now reading LR, to change it to FB. Click tracker #2. Click tracker #3. You'll get a
popup saying that the coordinate system will be applied once the scene is solved, click OK.
Now switch to the ![]() Solver room. Hit the Go! button. A display panel will pop up, and after a fraction of a second, it should say
Finished solving. Hit OK to close the popup. You could add some objects from the 3-D panel at this time, as in the automatic tracking example.
Solver room. Hit the Go! button. A display panel will pop up, and after a fraction of a second, it should say
Finished solving. Hit OK to close the popup. You could add some objects from the 3-D panel at this time, as in the automatic tracking example.
You can add some additional trackers now to increase accuracy. Use
![]() (or shift-F) to go to the end of the shot, and change to backward tracking by clicking the big
(or shift-F) to go to the end of the shot, and change to backward tracking by clicking the big
![]() on the playbar. It will change to the backwards direction
on the playbar. It will change to the backwards direction
![]() . Click to the Trackers room, and turn on the Create (
. Click to the Trackers room, and turn on the Create (
![]() ) button.
) button.
Tip : When you ‘play’ the scene, SynthEyes updates the tracking data only for trackers that are configured for the same tracking direction as the playback itself. See the directional indicator under the tracker mini-view to see the direction for given tracker(s).
Create additional trackers spread through the scene, for example only on white spots. Switch their tracker type from a match tracker
![]() to a white-spot tracker
to a white-spot tracker
![]() , using the type selection flyout button on the tracker control panel. (Note that
the Key- every spinner does not affect spot-type trackers
.)
, using the type selection flyout button on the tracker control panel. (Note that
the Key- every spinner does not affect spot-type trackers
.)
You'll see a red X in the tracker mini-view that shows the optimum location for the spot tracker, center on it and it will snap into place. You should adjust the Size spinners of the tracker as needed, so that the white spot fills approximately 2/3 of the field of view—otherwise the spot you are interested in will be affected by surrounding features. Re-center afterwards.

Hit Play to track them out. The tracker on the rock pile may get off-track in the middle since there are many similar rocks. You can either correct it by dragging and re- tracking, but it will be easiest for this one to keep it as a larger match-type
![]() tracker. Scrub through the shot to verify they have stayed on track, then control-A to select them all, and turn on the lock
tracker. Scrub through the shot to verify they have stayed on track, then control-A to select them all, and turn on the lock
![]() .
.
Switch to the Solver control panel , change the top drop-down box, the solving mode, from Automatic to Refine, and hit Go! again, then OK.
Go to the ![]() 3-D Panel, click on the create wand
3-D Panel, click on the create wand
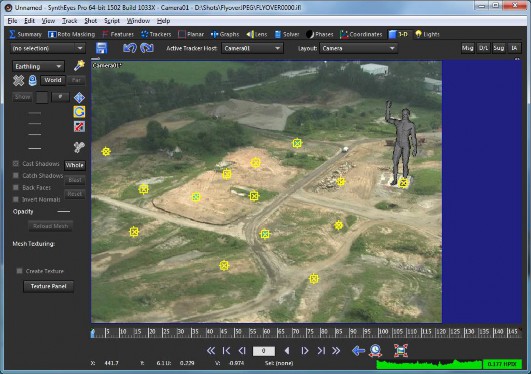
![]() , change the object type from Box (or Pyramid) to Earthling, then drag in the Top view to place an earthling to menace this setting. Click a second time to set its size. In the following example, the tracker on the concrete pad was used to adjust the height of the Earthling statue—using trackers as reference is generally
required to prevent sliding, unless they were used to set up the coordinate system. You can use pan-to-follow mode (hit the 5 key to turn it on or off) to zoom in on the tracker (and nearby feet) to monitor their positioning as you scrub. The statue was also rotated to face appropriately.
, change the object type from Box (or Pyramid) to Earthling, then drag in the Top view to place an earthling to menace this setting. Click a second time to set its size. In the following example, the tracker on the concrete pad was used to adjust the height of the Earthling statue—using trackers as reference is generally
required to prevent sliding, unless they were used to set up the coordinate system. You can use pan-to-follow mode (hit the 5 key to turn it on or off) to zoom in on the tracker (and nearby feet) to monitor their positioning as you scrub. The statue was also rotated to face appropriately.

Typically, supervised tracking is performed more carefully, tracking a single tracker at a time and monitoring it directly. SynthEyes generates keys every 20 frames with the settings shown; normally such automatically-generated keyframes are adjusted manually to prevent drifting. If you look at the individual trackers in this example, you will see that some have drifted by the end of the shot. Normally they are corrected, hence the term supervised tracking.
For more detailed information on supervised tracking, read the manual’s later write-up of supervised tracking , and see the online tutorial “Supervised Tracking Master Class.”
Note the error curve mini-view at lower right of the screen capture above showing that the tracking has solved reasonably accurately. Later we'll see how to examine the solve in detail.
©2024 Boris FX, Inc. — UNOFFICIAL — Converted from original PDF.
